Java Tutorial
IntroductionEnvironment SetupIDEBuild ManagementLanguage SpecificationBasic ProgramVariablesData TypesPackagesModifiersConditionalsLoopsObject OrientedClassesSuperInterfacesEnumStatic importInheritanceAbstractionEncapsulationPolymorphismBoxing & UnboxingConversion Formatting numbers Arrays Command line arguments in java Variable Number of arguments in Java Exception handling in Java String handling in Java StringBuffer and StringBuilder in Java Mathematical Operations in Java Date and Time in Java Regular expressions in Java Input output programming in Java File Handling Nested Classes Collections Generics Serialization Socket programming Multi-Threading Annotations Lambda Expressions Reflections in Java Singleton class in Java Runtime Class in JavaHow to load resource in JavaHow to load properties file in JavaAdvanced
Log4j – Logging framework in JavaInterview Questions in JavaTo execute Java programs, you need JRE – Java Run time Environment. But to write and compile java source code, you will need JDK – Java development kit. When you install JDK, JRE is automatically installed.
How to set up Java in Windows
- Download the JDK from Oracle download page. Depending on your system, you will download 32 bit or 64 bit exe file.
- Once the exe file is downloaded, just double click on that file and follow on-screen instructions to install JDK.
- Then You will have to configure some important Java environment variables as mentioned below.
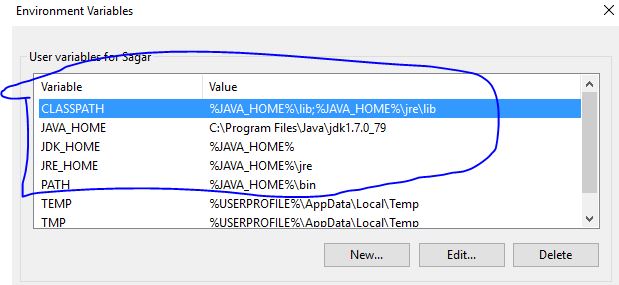
Configuring the Java Environment Variables – There are several Java Environment variables that you must configure as mentioned below. Just open Environment variables window and add these variables.
- JAVA_HOME : C:\Program Files\Java\jdk1.7.0_79
- JDK_HOME : %JAVA_HOME%
- JRE_HOME : %JAVA_HOME%\jre
- CLASSPATH : .;%JAVA_HOME%\lib;%JAVA_HOME%\jre\lib You can also give the path of other directories where java class files exists.
- PATH : Just append %JAVA_HOME%\bin to the value of PATH Variable. Be careful. DO NOT overwrite this variable’s value. Otherwise your system might not work properly.
Below images will guide you through Java Environment Variables configuration process in Windows.
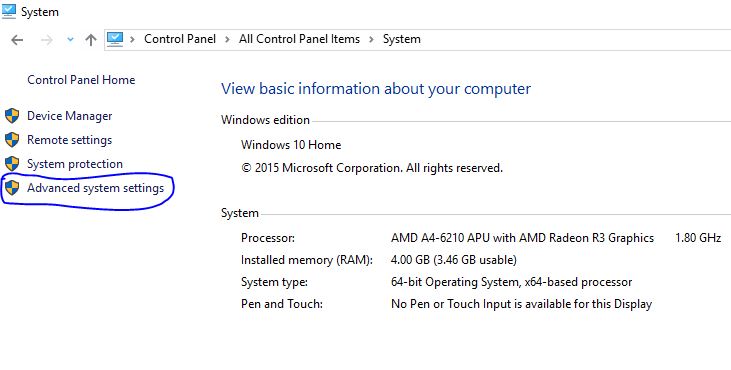
Step 1 – Open Advanced System Settings from Control Panel
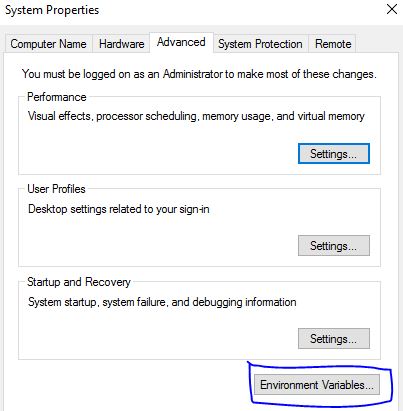
Step 2 – Click on Environment Variables Button
Step 3 – Add Java Environment Variables as shown in below image.
Web development and Automation testing
solutions delivered!!